Overnight Focaccia Recipe for Fluffy, Open Crumb Focaccia.
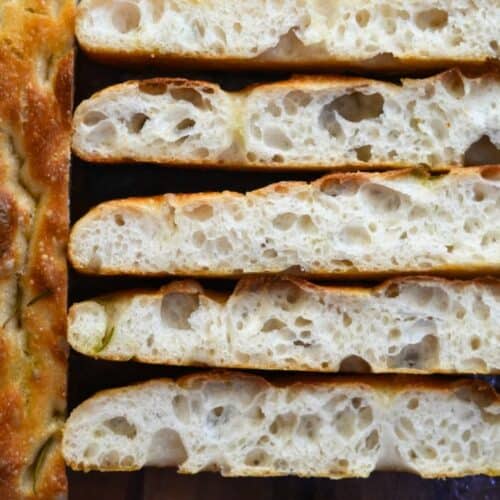
Easy, No knead Overnight Focaccia Recipe to help you make homemade Focaccia that has deep flavor and beautiful texture with open holes, soft and moist crumb and golden crispy crust.
Ingredients
For the dough
- 500 g Flour or approximately 4 cups – 2 tbsp (loosely packed)
- 400 ml Water or 1 and 3/4 cups – 1 tbsp
- 10 g Salt or 1.5 tsp
- 3 g Yeast or 1 tsp
For topping and greasing
- 30-45 ml Olive oil 2-3 tbsp
- 1-2 Rosemary Sprigs or you can add your favorite ingredients like garlic, caramelized onion or olives
Instructions
Prepare the Focaccia Dough
- Pour the water into a bowl. Add the yeast and salt, and stir to dissolve them. Then add the flour. Mix everything together. Make sure there are no dry patches left.You can use the rear end of a wooden spoon to mix he dough or can use a stand mixer.
- Once the dough is prepared, cover the bowl with plastic wrap or a silicone lid and let it rest at room temperature.
Proof and Fold the dough
- During the 1.5-hour(90 minute) bulk fermentation, you’ll perform 3 rounds of “stretch and folds”, spaced 30 minutes apart.
- Here’s how to do it:Lightly wet your fingers (to prevent sticking).Grab one side of the dough, gently stretch it upward, then fold it over onto itself.Rotate the bowl 90 degrees and repeat the same movement.Continue until all four sides of the dough have been stretched and folded.Then cover the bowl, and let it rest for another 30 minutes before the next round.
Cold Retard
- After 1.5 hours of proofing, along with the stretch-and-fold process, the dough will have noticeably risen and doubled in size.
- At this point, lightly grease the surface of the dough with a bit of olive oil to prevent it from drying out. Then, cover the bowl and place it in the refrigerator for an overnight rest — this step is known as cold retardation.
- You can keep the dough in fridge for 12-72 hours (up to 3 days). You can use this dough anytime during this cold retard from refrigerator and can make wonderfully fluffy focaccia with lots of open pores. I used the dough after 24 hours of cold retard.
Pre shaping
- When you’re ready to bake the focaccia, take the dough out of the refrigerator.Prepare your baking pan by greasing it generously with olive oil.
- If your pan is not non-stick, it’s best to line it with parchment paper before oiling, for extra insurance against sticking.
- Next, flip the dough upside down onto the prepared baking pan.To build structure and tension in the dough — which helps achieve a better oven spring — it’s important to Pre-shape the dough at this stage.Fold the dough from all four sides, just like shown in the video, then flip it so the smooth side is facing up.
- Finally, drizzle the top with olive oil and gently spread it across the surface and then cover it with a cling film.
Final Rising
- Let the dough sit and rise until it becomes visibly puffed up and airy. This final proof may take around 2 hours in a warm environment, or up to 2.5 hours if it’s cooler.After about one hour of proofing, I like to gently flatten the dough. This helps ensure your focaccia bakes with an even thickness, instead of rising higher in the center and becoming domed.
- To do this, carefully lift and spread the dough from underneath, using just the tips of your fingers. Be gentle so you don’t deflate the precious air bubbles that have formed.
- Once shaped, cover the tray with cling film and let the dough continue rising undisturbed for the remaining proofing time, until it’s soft, jiggly, and fully risen.
Bake the Focaccia
- After the final rise, your focaccia should look soft, puffy, and full of large and small air bubbles — a sign that it’s beautifully fermented and airy.Now, drizzle a little more olive oil over the top to keep the crust crisp and flavorful.
- You can add your favorite toppings at this stage — like garlic, olives, caramelized onions, or fresh herbs.
- Using the tips of your fingers, press down to create dimples all over the surface of the dough. Don’t be afraid to go deep — these dimples help the focaccia bake evenly and allow the oil and toppings to seep into the dough, creating those rich, flavorful oil tunnels in every bite.
- Now your focaccia is ready to go into the preheated oven!
- Bake at 425 F or 220 C preheated oven for around 25 minutes. Top of the focaccia should be deep golden brown and we need the bottom to be crispy and golden as well.
- Once the focaccia is done baking, transfer it immediately to a cooling rack. Let it cool for a few minutes so the structure sets, but focaccia is best enjoyed warm, when the crust is still crisp and the inside is soft and fluffy.
Video
Notes
Use a Metal Pan for making Focaccia
If you are using a glass or ceramic pan, then you may need to increase the baking time 5-8 minutes. Metal or cast iron gives the best crust. Glass or ceramic might lead to a soggier bottom. Cool on a Rack Immediately after bakingKeeps the bottom crisp. Don’t let it steam in the pan. Use a Generously Oiled Pan:
Prevent sticking and get that signature crispy, golden crust. Dough Will Be Sticky – That’s Good!
Use wet or oiled hands to handle it. Don’t add extra flour.
Tried this recipe?Let us know how it was!